http://www.youtube.com/watch?v=-1dInhZvy7o
Thursday, November 1, 2012
Wednesday, October 31, 2012
Decompression Lever

Anyway, to keep it old-schoolish, I put a mountain bike brake lever on the bars and ran a bicycle brake cable to the decompression arm under the tank. I had to mod a few pieces, but, it works like magic. Pulls smooth as butter.
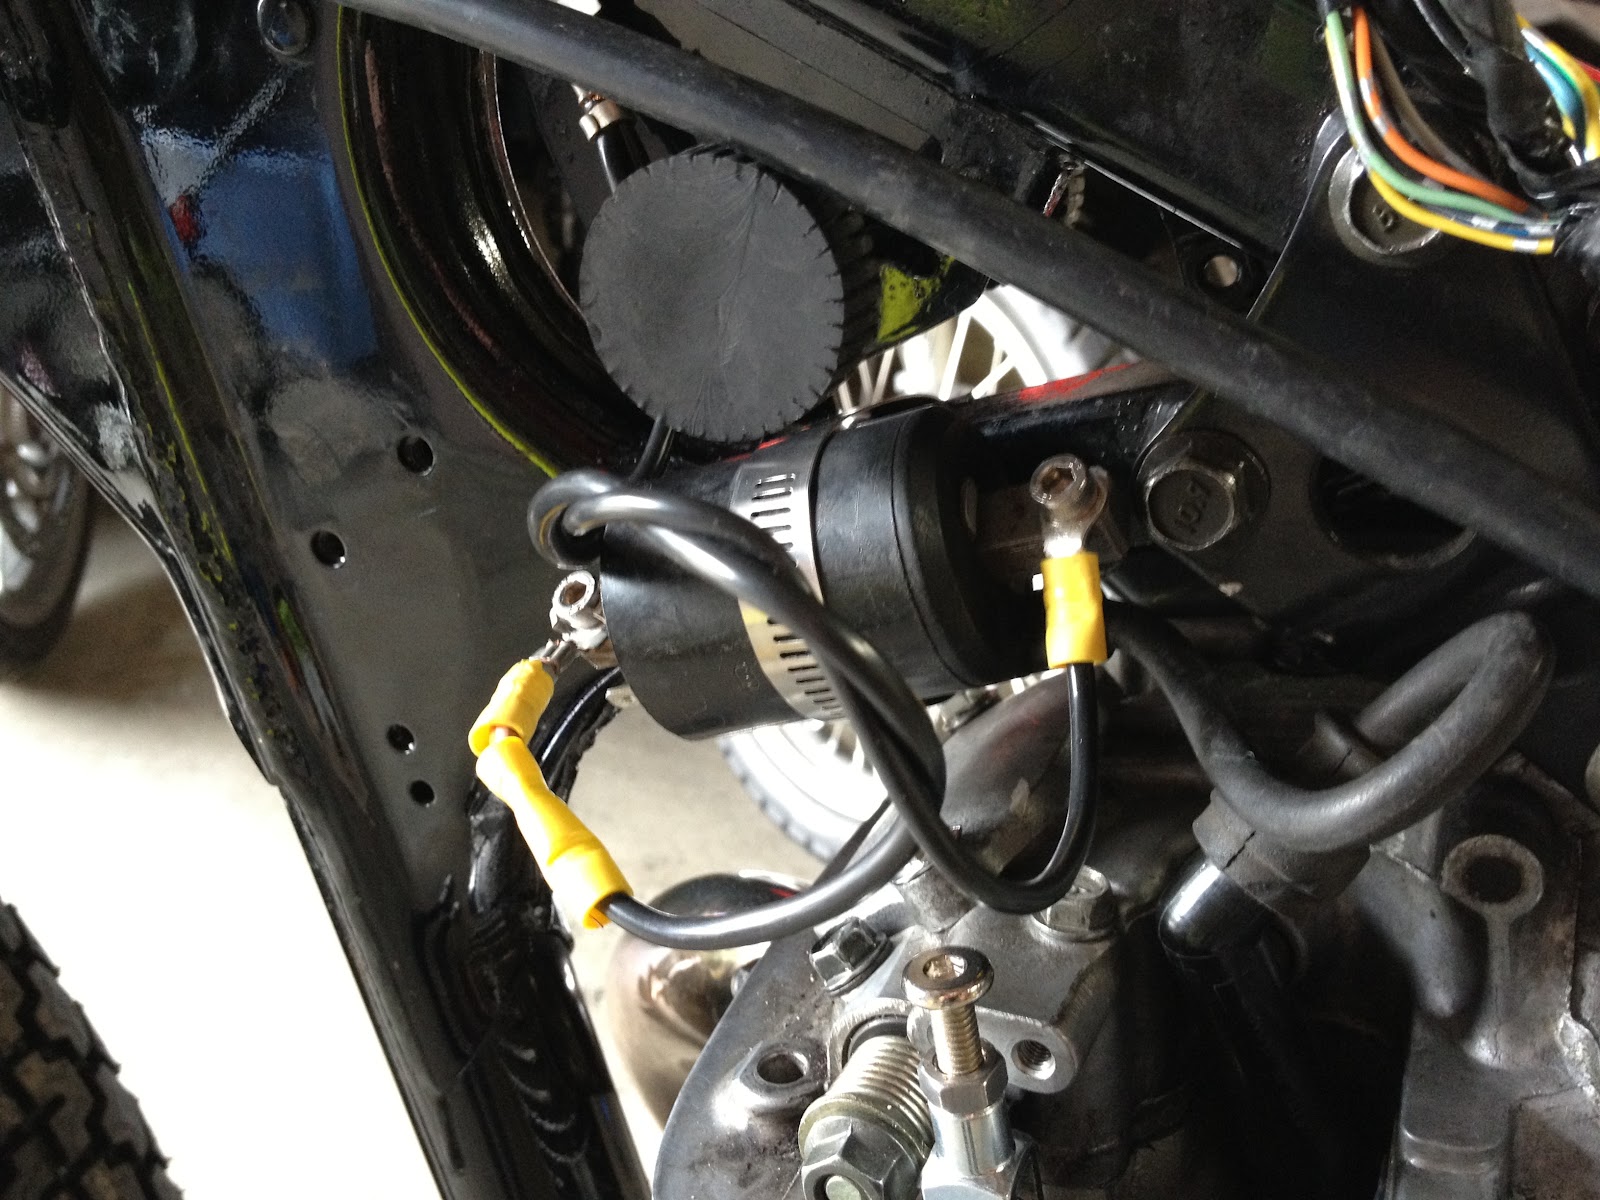
I do have a bit of a rats nest of wires there, my coil didn't fit under the tank like it was supposed to...


After lots of pissing around, I finally got a spacer machined to put the Supertrapp on the Ryca kit elbow. Whatever '80s aluminum Supertrapp can that is, it fits perfectly and sounds the business. That on, the fueling was still overly rich, so it meant time for a trip to the Dyno.

That's Nels Byersdorf running my bike on his Dyno. He's a super cool guy and the price is right, $50 a run. I have a 47.5 pilot and a 152 main in right now. Even after fiddling with the fuel screw it ran terribly rich. The first run it didn't even register on his air/fuel ratio. He recommended dropping down to like a 35 pilot and 135 main - I was saying WTF!!! He wisely noticed maybe the Ryca provided K&N filter is restricting air flow too much. He noted that filter is sized for a scooter or something. We popped it off and ran again and power jumped from 27.89 (with K&N) to 32.53 (open). Needless to say, that filter is useless on this bike. It's obvious Ryca uses it because it's the only thing that fits in that tiny space between the battery box and the carb. I rode home with a big grin, a 20% jump in power and a much better performing bike. To keep it from bogging when coming to a stop, the idle is set up around 1600 RPM I believe.

My next objective was to get a decent air filter on it. My velocity stack looks cool, but, like a set of Firestone Champions, it's all show no go. It will go well with a big filter over it, but, no space until I redo the battery box to make room. I don't want to go filterless.
I wanted a Uni after seeing how light and simple they are. I went to Bent Bike in Lynnwood an found this PERFECT rubber intake manifold in the parts bin. My carb O.D. is 57.1mm or 2.25". Amazingly, loads of the intake rubbers are 2.25".

So I went to the filter aisle and found this 7" x 2.25" Uni filter.
 Just a foam sock over a coil spring, brilliant. It sticks out behind
my leg just like a dirt tracker, even better. Soaked it in motor oil,
rung out the excess and popped it on. It ran like a top. And with
the deep POP-POP-POP bark from the Supertrapp,
it sounds like a KTM barreling down the road. I love it. To top it off, it (barely) clears the regulator/rectifier on the front of the battery box.
The Supertrapp was a bit of work. I had to get raw aluminum stock for my buddy to machine, but, turning it down was easy and fast. I alodined everything like a nerd to minimize potential corrosion. I kept the 6 discs and put an open flow disc on the end as seen below. "COMPETITION USE ONLY"


This also meant my rear brake rod wouldn't fit around the exhaust, so I flipped the arm up and bent it a bit so it wouldn't interfere with the shock.
Still plenty left to do. For starters, my gearing is tall enough to run 150 mph if I just had the power. I have the stock belt drive with a 2" larger diameter rim and a bigger tire to boot. With the chain installed and my 18/45 gearing, she should hoist the front end pretty handily. I changed the grips from the Ryca kit ones. Again, like Firestones, they look the business, but, are not practical. I like to ride in traffic with a finger or two on the brake and clutch and I had the bars bounce out of my smallish hands more than once with those HUGE vintage grips. I got some $5 Scott motocross grips. Vibes are just not a problem on this bike, unlike my old ZRX1100...
Speaking of harsh, the front end feels like it has about 2" of travel. I need to get some proper length springs, I seem to be bottoming them out on any bump at all. I assume the overly-long (after putting in a 2" spacer in the forks) spring coils are just bottoming out on themselves. I need to get the forks apart to find out.
The proof is in the pudding, red line is with no air filter and the blue one is with the K&N moped filter. You can see the run below, it was a cool day, about 53 degrees, so she's still a hair rich, but, not enough to worry about (and for a total of $50, cheers Nels!):

Thursday, August 2, 2012
Lotta water under the bridge...
Sunday, June 10, 2012

So today was the day, I started at 11am and finished at 8pm and she fired up on the first try. I made handlebar activated decompression lever (more on that later), but, was unsure how much it was helping. It needs more refinement, just like the rest of the bike.

The current tail unit, and I have to say it looks trick, is an old Ossa (maybe Bultaco) dirt tracker tail that's about 100 years old, I swear it's gonna crack just under my own weight. The new seat has to be painted, but, the bike just could not wait.


Thursday, June 7, 2012

Tuesday, June 5, 2012
Slowly, but...slowly
 Got the chain on. Best I can tell, the front sprocket needs a small spacer behind it and I machined down the splined old hub to use as the outer spacer for the nut. Clearance issues with the rearset brackets and swingarm are TBD.
  Drew had a good idea of JB Welding up the frame tubes to make a sandable
surface to make sure the seat bracket sits squarely on. Worked a treat
as you can see in the pics.
Drew had a good idea of JB Welding up the frame tubes to make a sandable
surface to make sure the seat bracket sits squarely on. Worked a treat
as you can see in the pics.


I picked up this seat from another DIY bike builder in town, he's got a neat TT500 and an old Shovelhead. Looks like an old Bulltaco tracker seat.
Wednesday, May 30, 2012

Monday, May 28, 2012

The carburetor is tuned and on the bike. I had a Ryan Gosling moment when I recreated the scene in the film Drive where he's working on the carburetor on this living room table. I did the RYCA carb tune and upped the main jet to the 155 and the pilot to the 55. Easy peasy, except the pilot screw was too tight and I stripped the screw slot. Luckily I had a small bit and an EZ-out. Main concern was keeping the swarf out of the carb. I also drilled out the air mixture screw and turned it out 1.5 turns (from all the way in) per the RYCA youtube video instructions for sea level.
Check out the flash velocity stack. It fits perfectly. Amazing considering nothing else has. A pleasant shock. The mouth is in a fairly confined area for air availability, however, no more so than the K&N filter that comes with the kit. You can see where the upper edge of the bellmouth opening slots exactly into the stock cutout in the RYCA kit and the stock frame cross member.


This pic to the right shows the stack and carb from above. Miraculously, no riding condition:
Now: what's wrong -
Here's where things started tanking. First off, I the decompression pin or whatever it is called under the valve cover is already cocked slightly forward. You can take off the valve adjustment doors and get on the right hand side of the bike and look in and you'll see how it works. When the decompression pin is turned CCW (as viewed from the LH side of the bike), it pushes down on the rocker arm and opens the valve just enough to reduce the compression to prevent straining the starter motor. The idea in the RYCA kit is brilliant, I loved (past tense), the stainless lever/linkage mechanism that is foot activated using the old brake pedal. Brilliant stuff, lots of geeky moving parts, very clever and mechanical. However, in the photo below, you can see my decomp pin at rest.

The following photo shows where it engages the rocker, meaning where it
starts to push the rocker down, crack the valve open slightly and reduce
compression. That's about 15 degrees from horizontal. I bent the
long SS rod at the existing elbows repeatedly trying to gradually get
the angles I needed to be able to activate the decomp pin WITHOUT having
it touching the rocker at rest. The mechanical advantage or in this case disadvantage is just too great to over come without modifying the rod for my bike. The clevis pins were all maxed out in the sharpest bend angles and the connection still could not be made without pre-loading the rod. You'll have to look at all of this on
the bike to really follow what I'm saying. Sorry for the blurry pics.

So remove adjust install remove adjust install. I finally went to tighten the SS linkage rod to the clevis at the foot pedal and it snapped at the threads, ironically, where no bending or anything had been going on. Anyway, the POS is now a hand activated decomp mechanism. One less thing to break in the long run. Obviously this system is working on all of the other RYCA bikes, but, on mine, due to the location of the welds, decomp pin, or whateverTF, it grenaded. See the snapped rod below, nothing left on it, but, the jam nut. My advice on this part of the build: baby steps, be mighty gentle. The SS linkage rod seems to be made of butter.

That was no big deal other than lost time. The problem is that my tank was welded back together with the inside too narrow. I had to narrow the mounting rod with the rubber stoppers on the end just to fit it in, see other posts on this blog. Next, I mounted the coil per the RYCA instructions and sure enough, it rides on the inside of the tank, even with the corner filed down just like theirs is in the video. Even with the spacers ground down as far as possible. Basically it does not fit where it is supposed to, so I have it hose clamped to the frame just below. I ran the grounds to an empty hole in the frame. Bad luck, but, problem solved.
At the very bottom of this photo you can see my half-ass, hand-activated work-around for the decompression. It's just a bolt screwed into the clevis, sitting freely. It is possible to decompress by hand. I'll have to hold the clutch in with one hand to start it according to all of the discussion on the Savage forum. No big. I will come up with something better, but, for now, the mission is to get the bloody thing to fire up. The motor still has not been fired up since the rebuild. Hopefully by the end of this week. My seat should be ready soon too. Until then, it's time to put on my new Twerps record and have a beer.
Saturday, May 19, 2012
Well it was a big day in Street Tracker world. I have finished painting the tank and I'm letting the paint/clear go off before I buff the orange peel out (hopefully). The paint is far from perfect - blems, color sand-through, imperfect tapelines, but, I love it. The claret metallic red really pops out in the sunshine. I'm digging it.
 So I went to mount the tank and yet another piece of the RYCA kit needed to be shaved down to work. You can see in the pic above that the tank mount was too wide to even fit into the grooves. The opening to get it in was narrower than where the mount sits in the tank receptacles. So I had to grind down the mount and the rubber ends to make it slot in. Now it's wobbly when installed, but, fits. I'll make it work.
  Some things I've learned painting: the key to rattle
 can success is many, many coats with heaps of sanding in between, to perfectly smooth the surface. When it comes time to clear coat, that baby needs to be like polished granite. I must have spent 15 hours sanding, painting, cleaning, etc. And it still could have used more work. The rustic finish suits the bike, in contrast to the bike in the foreground...
Tomorrow I hope to get it close to being able to fire up, though nothing has gone according to plan yet. I'm not holding my breath.
If this garage was attached to my apartment, I'd be up all night working on the this thing. It's an obsession at this point, the bad kind, ha ha.

Long, lean and not too far in between...
I'm looking for some wide, #24 flat tracker bars, but, the killer is the 1" switchgear and risers, which will have to be shimmed to work with a 7/8" bar. I'll cross that bridge after she's running. I also dropped the seat off yesterday to John of J's Upholstery in Shoreline. I'm going for the old school look all around. He was super cool and has a bobber himself, so it's all in good hands. Cheaper than the shops around town too.Thursday, May 17, 2012

By the way my name is not Frank Machin, that's just one of my fav film characters in the British classic, This Sporting Life. Richard Harris got the best actor award in '63 at Cannes for it.

 Have to hand it to the RYCA guys, they did a ton of work and developed a really cool product, undoubtedly at the expense of their personal lives for aeons. But, some of the designs are not optimal, nor is every bike constructed identically, so lots of rework and/or modifying/adjusting is required. The kickstand bracket is a Mickey Mouse job to say the least and I had to get my own bolt to ensure it didn't ride against the frame there. We also cut a little spacer on the far side of the tension strap to prevent it from bending so much and forcing my bolt into the frame.
Back in the "south campus", it was time to get the tank painted so I could mount it and get the bike together enough to try and fire it up. After calling around several garage painters and finding their magic skills would set me back $800-1000 for the tank alone, I recovered from the belly laughing and headed to NAPA for rattle cans. After getting a base coat of white over the gray primer, I taped off my pattern and plowed ahead. It's so tough to get good 'set' with rattle cans, but, I resigned to spending hours sanding. And that's just what I did...

Let it dry, off to bike night now...

Backfire Moto puts on the Ballard Bike night every 3rd Wednesday. This was the first sunny, warm day and it was a cracker. Must have been 600 bike there. I love the 80's race reps. I once had an NC30 and wish I had it now, probably the coolest bike I ever had.

Had to throw this pic in as that's my buddy's old Baja at bike night. He sold it before he moved, now splitting his time between Hawaii and Nicaragua, tough life... I liked it better before the horns and skateboard rack.

You have to love projects.


I should have built a Kawasaki, let the good times roll...


Though it was no prob to grind out the old and weld in the new, it was not jigged and it consequently was not aligned perfectly when we put the axles in. Luckily, Jon pointed out how easy it is to bend the steel swinger and we did just that by hand and it's good as new.

Monday, April 2, 2012
Motor assembly complete

Finally got all the parts together and some time in the shop to get the motor re-ringed, and back together. It started with a hone of the cylinder to deglaze the friction surface. Jon whipped out the aircraft cylinder adjustable hone. It has two blades that are felt and two super fine stone blades. He also has a homemade oil bath that squirts oil in a recirculating system that filters it while you are honing. Pretty slick.

After honing, the cylinder goes on. Jon punched out a super thin ring sleeve to hold the rings tight as you slide them into the cylinder, using a hose clamp to keep the sleeve tight. As the cylinder is lowered over the rings, the sleeve is pushed down slowly because Jon punched dimples in it so it wouldn't slide up in the cylinder as well. "You think I done this a few times before??" he says...

Prior to torquing down the studs, Jon suggested we anneal the copper washers that go under the nuts and act as seals. The method: heating the washers until barely glowing then dropping them in water. Then we torqued down the cylinder, the head and dropped the cam in, checked the timing marks then finally time to call it a night.


Subscribe to:
Posts (Atom)